
ASUS Recovery DVD Disc (АСУС рековери DVD диск) — диск для восстановления вашей операционной системы и драйверов.
ASUS Recovery DVD позволяют не только восстановить ОС, но а так же и скрытый раздел, посредством которого Вы в дальнейшем сможете восстановить систему без физического диска.
Обычно необходимость в восстановление скрытого раздела возникает после его неосмотрительного удаления или в случае установки нового жесткого диска (например: upgrade).
Если у Вас есть ASUS Recivery DVD Disc, то процесс восстановления не потребует новых знаний, умений и будет происходить по следующим шагам:
1. подключите блок питания к вашему устройству (ноутбуку, eeepc и т.д.);
2. включить ноутбук кнопкой пуск, в момент запуска удерживать кнопку ESC
3. вставьте первый диск резервной копии ASUS Recovery Disc 1 в дисковов DVD привода (если у Вашего устройства нет встроенного дисковода, то Вам необходимо подкючить внешний дисковод и вставить в него ASUS Recovery Disc1);
4. в новом появившемся меню, Вам необходимо выбрать DVD привод и нажать ENTER;
5. в процессе восстановления Вас спросят на сколько дисков необходимо разбить жесткий диск и на какой из разделов установить скрытый раздел рекавери;
6. на предупреждения отвечаем OK;
7. в процессе установки если Ваш ASUS Recovery DVD находиться на двух дисках, Вам необходимо будет вставить
ASUS Recovery DVD 2;
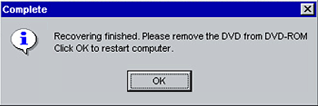
8. по завершению процесса восстановления появиться надпись об успеном завершении восстановления скрытого раздела и ОС.
This is a guide about Asus recovery disks for the following versions of Windows: Windows XP, Windows Vista, Windows 7 or Windows 8.
A recovery disk is also known as a restore disc, repair disc, boot disc or rescue disk.
Download alternative recovery disk for Asus
If your Asus computer no longer has the recovery partition needed to restore the computer, you can use an alternative recovery disk to access and backup your files.
You can download Easy Recovery Essentials, our recovery and repair disk. It’s an ISO download image ready to be burned directly to a CD, DVD or a USB flash drive.
Easy Recovery Essentials is compatible with all Asus computers and with the following Windows versions:

Note: Easy Recovery Essentials can not be used to install or reinstall Windows.
Features of Easy Recovery Essentials for your Asus computer include:
- Automatically find and fix boot errors
- Works even when you can’t get into Windows
- Recover from virus infections
- Restore your PC to a working state
- Access and backup your important data
- Advanced tools for IT experts
With Easy Recovery Essentials you can:
- Find and fix errors automatically with Automated Repair
- Recover your PC from infections with the built-in antivirus
- Restore your PC to a working state
- Access and backup your most important data (like documents, pictures, music, videos and so on)
It’s compatible with Asus computers (laptops, desktops etc.) and with the following Windows versions: XP, Vista, 7 or 8.
Windows XP users
Easy Recovery Essentials can be used as an alternative recovery disk for computers from Asus with Windows XP installed, including the full list of Windows XP editions with Service Packs installed:
- Microsoft Windows XP SP1 (Service Pack 1)
- Microsoft Windows XP SP2 (Service Pack 2)
- Microsoft Windows XP SP3 (Service Pack 3)
It’s compatible with both the Home and Professional editions of Windows XP:
- Microsoft Windows XP Home
- Microsoft Windows XP Professional
Windows Vista users
You can use Easy Recovery Essentials as an alternative recovery disk for Asus computers, if you have Windows Vista installed.
Easy Recovery Essentials supports x86 and x64 platforms and all Windows Vista editions, including the 32-bit and 64-bit editions:
- Microsoft Windows Vista Ultimate (32-bit and 64-bit editions)
- Microsoft Windows Vista Enterprise (32-bit and 64-bit editions)
- Microsoft Windows Vista Business (32-bit and 64-bit editions)
- Microsoft Windows Vista Home Premium (32-bit and 64-bit editions)
- Microsoft Windows Vista Home Basic (32-bit and 64-bit editions)
- Microsoft Windows Vista Starter (32-bit edition; Starter edition doesn’t have a 64-bit edition)
It’s compatible with any of the available Service Packs of Windows Vista:
- Microsoft Windows Vista Service Pack 1 (SP1)
- Microsoft Windows Vista Service Pack 2 (SP2)
Windows 7 users
Easy Recovery Essentials can be an alternative recovery disk for Asus computers with Windows 7.
Easy Recovery Essentials supports both x86 and x64 platforms and is compatible with the full list of Windows 7 editions, including the 32-bit and the 64-bit:
- Microsoft Windows 7 Ultimate (32-bit and 64-bit editions)
- Microsoft Windows 7 Enterprise (32-bit and 64-bit editions)
- Microsoft Windows 7 Professional (32-bit and 64-bit editions)
- Microsoft Windows 7 Home Premium (32-bit and 64-bit editions)
- Microsoft Windows 7 Home Basic (32-bit and 64-bit editions)
- Microsoft Windows 7 Starter (32-bit edition) (Starter is available only in 32-bit)
It’s compatible with SP1 of Windows 7:
- Microsoft Windows 7 Service Pack 1 (SP1)
Windows 8 users
Easy Recovery Essentials can be used as an alternative recovery disk for Asus computers with Windows 8 installed.
It supports the x86 and x64 platforms and all the Microsoft Windows 8 editions (8 and 8.1), including the 32-bit and the 64-bit editions:
- Microsoft Windows 8 (32-bit and 64-bit editions)
- Microsoft Windows 8.1 (32-bit and 64-bit editions)
Recover Asus computers using the recovery disk or recovery partition
Asus computers have a recovery partition, named “RECOVERY” that you can use to restore your Windows. Various models (not all) from Asus have a recovery DVD that can be used for the same recovery and restore process.
If you do not have a recovery DVD or a partition called “RECOVERY”, go to Download an alternative recovery disk for Asus.
How to access the recovery partition
The recovery partition is available only if your partition is undamaged! If the partition is corrupt, use the recovery DVDs instead.
- Restart your computer
- Press F9 repeatedly before the Windows logo appears, right after the Asus logo appears
- Select Windows Setup [EMS Enabled]
- Follow the wizard steps
How to access the recovery DVDs
- Restart your computer
- Boot into BIOS by pressing F2
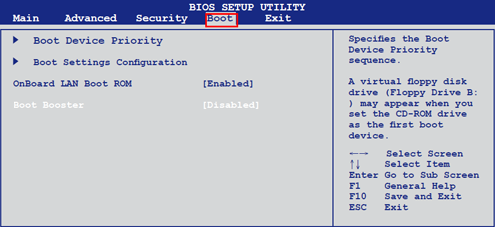
- Go to the Boot tab
- Make sure Boot Booster is [Disabled]. Eee PC models have this option.
- Press F10 to save the changes and exit BIOS
- Insert the recovery DVD in the disk tray
- Restart your computer
- When the “Please select boot device:” screen appears, select the DVD. It may be marked with “USB:“, but it’s usually the last item from the list
- Press Enter to select the option
- When the “Press any key to boot from CD…” screen shows up, press any keyboard key to continue
- Follow the wizard steps
Recover Windows XP with the disk or the partition
Windows XP users can restore their Asus computer using the “RECOVERY” partition installed on their hard drive or using the recovery DVD. If you no longer have the “RECOVERY” partition intact, go to Download alternative recovery disk for Asus.
Instructions when using the recovery partition:
Personal data will be lost during the recovery process. Backup your computer!
- Restart your computer
- Press F9 before or when the Asus logo appears
- When the Windows Boot Manager screen appears, select Windows Setup
- When the Recovery System screen shows up, click on Recovery
- Follow the wizard steps
Instructions when using the recovery DVD:
All data will be lost during the recovery process. Backup your computer!
- Restart your computer
- Press F2 multiple times to boot into BIOS
- Go to the Boot tab
- Check if there is a “Boot Booster” option. If your computer has this option, select it and make sure it’s [Disabled]
The Recover system to a partition option allows you to keep other partitions and only delete the one you choose.
The Recover system to entire HD option will delete all partitions from your hard disk.
Recover Windows Vista with the disk or the partition
Users of Asus computers with Windows Vista installed can either use the recovery partition or the recovery DVD. If you no longer have the “RECOVERY” partition intact or the DVD, go to Download alternative recovery disk for Asus.
Instructions when using the recovery partition:
All data will be lost during the recovery process. Backup your computer before you continue!
- Restart your computer
- Press F9 during booting – before or when the Asus logo appears on your monitor
- Press Enter and select Windows Setup [EMS Enabled]
- At the ASUS Preload Wizard screen, click Next
- Select a partition and then click Next.
You have 3 options at this step: Recover Windows to first partition only, Recover Windows to entire HD or Recover Windows to entire HD with 2 partitions.
The Recover Windows to first partition only option will delete only the first partition and you can keep the other partitions.
The Recover Windows to entire HD option will delete all your partitions.
The Recover Windows to entire HD with 2 partitions option will delete all partitions and create 2 new partitions: C and D.
Instructions when using the recovery DVD:
All data will be lost during the recovery process. Backup your computer before you continue!
Before you start:
- If your computer uses a secondary hard disk drive, remove it. Windows Vista may setup incorrectly on the wrong disk drive.
The instructions are:
- Insert the recovery DVD in the disk tray
- Restart your computer
- Press Esc during booting and select your optical drive to boot from: CD/DVD
- When CD/DVD option is selected, press Enter
- Select your option and then click Next.
Similar to the recovery partition’s instructions above, you have 3 options at this step:
Recover Windows to first partition only: this option will delete only the first partition and you can keep the other partitions.
Recover Windows to entire HD: this option will delete all your partitions.
Recover Windows to entire HD with 2 partitions: this option will delete all partitions and create 2 new partitions: C and D.
Recover Windows 7 with the disk or the partition
Windows 7 users can use the recovery partition or the recovery DVD to recover an Asus computer. If you no longer have the “RECOVERY” partition intact or the DVD, go to Download alternative recovery disk for Asus.
Instructions when using the recovery partition:
All data will be lost during the recovery process. Backup your computer before you continue!
- Restart your computer and start pressing F9 during booting
- Select Windows Setup [EMS Enabled]
- Select the language
- Click Next
- When the ASUS Preload Wizard screen appears, click Next
- Select the partition you want to delete and use for the recovery process and click Next.
You have 3 options at this step:
Recover Windows to first partition (this will delete only the first partition and you can keep the other partitions), Recover Windows to entire HD (this will delete all your partitions from the hard drive) and Recover Windows to entire HD with 2 partitions (this will delete all your hard drive partitions and create 2 new ones: C and D)
Instructions when using the recovery DVD:
All data will be lost during the recovery process. Backup your computer before you continue!
- Insert the Recovery DVD in your computer’s optical drive
- Restart your PC
- Press Esc during booting and select the CD/DVD option to boot from the DVD
- Once the CD/DVD option is selected, press Enter
- Click OK to start the restore process
- Click OK to confirm the process (the process will overwrite your hard drive and remove all personal files)
- Follow the instructions to complete the recovery process
If you don’t have a Recovery DVD from Asus for Windows Vista, you can create yours if:
- You have the recovery partition intact
- You have the AI Recovery Burner icon on your desktop
If you have the AI Recovery Burner on your desktop, follow these instructions to create a Recovery DVD:
- Remove any external hard drives from your computer
- Click on AI Recovery Burner
- Insert your DVD (must be blank) and select it from the list once it appears
- Click OK
- Follow the next steps to complete the process
Recover Windows 8 with disk or partition
Windows 8 users can use the recovery partition or the recovery DVD to recover an Asus computer. If you no longer have the “RECOVERY” partition intact or the DVD, go to Download alternative recovery disk for Asus.
Instructions when using the recovery partition:
All data will be lost during the recovery process. Backup your computer before you continue!
- Restart your PC
- Press F9 during booting
- When the “Choose an option” screen of Windows 8 appears, go to Troubleshoot
- Click on Advanced Options
- Select System Image Recovery
- Choose an account you want to use
- Type in the account’s password
- Click Continue
- Select Use the latest available system image (recommended) option and then click Next
- Follow the wizard steps to complete the process.
Instructions when using the recovery DVD:
All data will be lost during the recovery process. Backup your computer before you continue!
- Restart your PC and start pressing the F9 key during booting
- Wait for the Choose an option screen to show
- Go to Troubleshoot
- Click on Advanced Options
- Select System Image Recovery
- Choose an account you want to use and type in the password
- Click Continue
- Select Select a system image, as you have the Recovery DVD. If you don’t have the DVD, use the other option
- Follow the wizard steps to complete the process.
More Information
Support Links
It’s an easy-to-use and automated diagnostics disk. It’s available for Windows 8, Windows 7 and Windows Vista. It’s also available for Windows XP and Windows Server.
Read more at Windows Recovery Disks.
Applicable Systems
This Windows-related knowledgebase article applies to the following operating systems:
- Windows XP (all editions)
- Windows Vista (all editions)
- Windows 7 (all editions)
- Windows 8 (all editions)
- Windows 8.1 (all editions)
- Windows Server 2003 (all editions)
- Windows Server 2008 (all editions)
- Windows Server 2012 (all editions)
Applicable Models
This Asus-related knowledge base article applies to the following computer models:
- All Asus series: CG8270, CG8480, G50AB, CG8565, CG8580, G10AC, G70AB, CG8265, CG8890, G30AB, CM6630, CM6431, CM1745, CM1855, M11BB, M70AD, P30AD, CM1831, CM6330, CM6340, M11AA, M51BC, M31AD, CM6870, CM6331, CM1435, M51AC, M11AD, M51AD, CP6130, CM6731, K5130, CP6230, CP3130, K30AD, CM1740, CM1735, UL50At, U35F, U30SD, U46E, U44SG, U47VC, S56CM, U24A, UX42VS, S46CB, UL30Jt, U31JG, U53SD, U36SD, U32U, S56CA, U38N, X201E, U32VJ, S56CB, U45Jc, U41JF, U40SD, U56E, U24E, U82U, U32VM, U38DT, N71Ja, N61Jv, N53Jn, N53Jg, N73Jf, N53JL, N53SN, N75SF, N55SF, N56VM, N76VM, N76VJ, N56VB, N550JV, N46JV, N541LA, N71Jq, N82Jv, N73Jg, N43JQ, N61DA, N73SV, N43SL, N53DA, N53SM, N56VZ, N76VZ, N56VJ, N56DY, N750JV, N56VV, N550JA, N71Jv, N82Jq, N73Jn, N43Jf, N82Jg, N53SV, N43SN, N43SL, N45SL, N46VM, N56DP, N76VB, N46VB, N550LF, N56JR, G60J, G51Jx, G53Jw, G74SX, G55VW, G750JX, G51J, G51Jx, G53SW, G53SX, G75VX, G51J, G60Jx, G73SW, G75VW, G750JW, U53Jc, U43SD, NX90Jq, NX90Jn, K72JU, K43TA, K53SD, K53TK, X54HR, K73TK, K55VM, K75VM, K73BR, X55U, X501A, X75A, X55VD, S46CA, S56CM, K56CA, K95VJ, 1015E, X75VC, X450VC, X550VC, K46CB, X750JB, X550VB, X450VE, X451CA, X550LC, F450CA, X552EA, X552VL, X450LC, X550CL, X450LD, X550LN, X551MA, K72DY, K53U, K52JK, X44L, X54HY, K73SJ, K62F, K52JT, K42JP, A52JU, A42JY, K53SJ, A72JK, K42JK, A42JV, A52JB, K42DE, A52F, K42Jr, A42F, K42JA, K72DR, A42JE, K53TA, X54L, K53BR, K73SD, K55A, K55DR, K75DE, X55A, X301A, X401U, X75VD, X45VD, K46CM, S56CA, K45VS, K73BE, X402CA, X450CA, X550CA, X75VB, X550DP, X450JF, X102BA, K95VB, X550LA, X750LA, X452EA, X552EP, X450LA, X452CP, X450LN, F200MA, K43BY, K53SC, K52JB, X44LY, X44H, X44C, K62Jr, A72DR, K52JU, K52JV, A42JZ, K53E, K42JB, A42JB, A52JC, A42JC, K52F, K72F, A52N, K42JE, A52JE, A42DE, K73TA, K43BR, K42DY, X54C, K55VD, K73SM, K45A, K95VM, X55C, X501U, X401A, X45A, S46CM, K46CA, K56CM, K75VJ, X201E, X502CA, X450CC, X550CC, K56CB, X750JA, X450VB, X200CA, X551CA, X550LB, X750LB, X452EP, X552CL, X450LB, X550VL, X452VP, X550LD, X451MA, X200MA, K43U, K93SV, K53BY, X54H, X44HY, X44HR, K42JY, K42JZ, A52JT, K52DY, K53SV, K73E, K42JC, A42JK, A52JK, K42DR, A52Jr, A72F, A42Jr, A42N, K52DE, A42JA
- Essentio series: CG5290, CG8250, CG1330, CG8350, CM1530, CM1730, CM1630, CM6830, CM6650, CM6850, CP1130, CS6110, CM6730
- Asus Eee PC series: 1015BX, 1011CX, 1016P, 1015P, 1015PEM, 1015T, 1015PX, 1215N, 1015PE, X101, 1025C, 1225B, 1015CX, 1001PX, 1015PED, 1215T, 1011PX, X101CH, T101MT, X101H, 1025CE, 1215P, 1001PQ, 1015PD, 1001PXD, 1215B, 1015PN, 1015B, 1225C
- Zenbook series: UX21E, UX32VD, UX31LA, UX302LG, UX31E, UX21A, UX32A, UX31A, UX301LA, UX31A, U500VZ, UX302LA
- VivoBook series: S551LA, S500CA, S550CA, S300CA, S301LA, S200E, S451LB, S301LP, S400CA, S550CM, S550CB, S551LB, F200CA, S451LA, F450CC, F200LA
- Taichi series: 31, 21
Как восстановить систему на ноутбуке Asus
Восстановление системы ноутбука проходит процессом возврата к его заводским настройкам. Как показывает практика, заводские настройки ноутбука являются самыми подходящими именно вашей модели ноутбука фирмы Asus. Они создаются, учитывая все параметры и мощность ноутбука, так что возврат к ним, является хорошей идеей.
Если раньше вы уже занимались подобными операциями, то справитесь и с этой, но если же вы не уверены, то лучше обратитесь, в лучший сервисный центр Asus, к компьютерным специалистам.
Восстановить систему не выйдет в том случае, если:
— Вы уже хоть раз переустанавливали Windows. Во время процесса установки удаляются нужные файлы для восстановления системы.
Не ссылайтесь на то, что вашe ОС Windows переустанавливал мастер, ведь скорее всего, он, так же мог удалить этот нужный нам файл.
В этой ситуации, вам не остаётся ничего, кроме как найти или купить диск с восстановлением родных настроек. Так же его можно скачать на проверенных источниках, используя просторы интрернета.
Мы расскажем вам, как восстановить систему ноутбука Asus, если вы не переустанавливали вашу версию Windows. Для того, чтобы выполнить восстановление системы через БИОС на ноутбуке Asus, нужно выполнить подготовительные работы.
Подготовка к восстановлению системы
- Если на компьютере есть важная информации, то её нужно скинуть на флешку. Особенно это касается файлов на диске С.
С Диска D можно ничего не удалять, но чтобы обезопасить себя, скиньте важные файлы и из этого диска.
- Помните, что версия Windows тоже перезапустится.
- Эта процедура займет некоторое время после первого включения компьютера, чтобы он установил все нужные настройки на ноутбук.
. ВНИМАНИЕ. Вы не решите всех проблем ноутбука восстановлением системы. Убедитесь, что вам вообще нужна эта операция. Проконсультировавшись с профессионалом до начала восстановления.
Эта операция не сложная. Вы сможете справиться самостоятельно.
Как запустить восстановление системы на ноутбуке Asus
- Включаем ваш ноутбук. До начала загрузки, жмём одну из кнопок: «Delete» или «F2» (в новых моделях нужно нажать «F10»).
- Перед вами должно появиться окно подсистемы БИОС. Выбираем вкладку с названием «Boot».
- В открывшемся окне нужно выбрать «Boot Booster» и нажать «Enter».
- Здесь выбираем «Disabled».
- Далее нужно сохранить изменения, нажав на последней вкладке «Save changes and exit»
- Компьютер автоматически перезагрузится, после чего его нужно выключить.
- Повторите Пункт 1, только до включения нажмите «F9».
- Вы увидите окошко с вопросом, где нужно нажать «ОК».
- Процесс восстановления системы начат.
Пока идет перезагрузка, ноутбук может несколько раз самостоятельно перезагрузиться.
Готово! Теперь ваш компьютер, как только что из магазина. Удачного использования.
Вы можете задать вопрос мастерам из нашего сервисного центра, позвонив по телефону или написав свой вопрос на форму обратной связи.
Ваше сообщение отправлено.
Спасибо за обращение.

Автор:
Возможно вас также заинтересует
Ремонт ноутбуков ASUS за 1 день
Закажите ремонт в нашем сервисном центре, и получите исправное устройство в тот же день, с гарантией до 1 года
Узнать точное время и стоимость ремонта Спасибо, не надо
Комментарии (0)
Добавить Комментарий

Оставьте ваш вопрос через форму обратной связи и вам перезвонит именно мастер и ответит без навязывания каких — либо услуг.